

When I first started photography, I was very puzzled about aperture, shutter speed and ISO. I call this the “Illuminati triangle of confusion”. Mainly because they’re all linked to each other (in some weird way) and I couldn’t differentiate the effects between them.
So, since the camera works by collecting rays of light and focuses it onto the lens, I thought of relating photography to ourselves. Our eyes pretty much work the same way as a camera. The light passes through our pupil, via the hole of the iris, and focuses it on the retina. So, to make things easier, I tried linking the camera to my eyes and it became so much more understandable.
Let’s get started!
Shutter Speed
The pupillary light reflex is the reflex that controls the diameter of the pupil, in response to the intensity of light that falls on the retina of the eye (glad that’s over!).
In other words, when you stare at something bright, our iris shrinks and the pupil becomes smaller, so less light penetrates through. Shutter speed works the same way. When your taking a picture in a place that’s terribly bright (like directly under the Sun), then your picture would be overexposed (way too bright). So, shutter speed controls the exposure of the image, much like the iris of our eyes. The higher the shutter speed, the more light is allowed through.
Check out the differences:
Shutter speed: 1/30
Shutter Speed: 1/125s
Shutter speed: 1/250s (Personally, I like this picture the best. It has the right amount of light, enough to see the buildings and the bright clouds)
Shutter speed: 1/800s
So, when you’re taking a picture in a bright place, don’t forget to reduce your shutter speed (unless you’re going for something gloomy and mysterious).
Don’t you think it’s time for a break…
Aperture
Stare at the room around you for awhile. Slowly focus in on an object in front of you. Keep doing it. Now, do you realise how everything around the object is blur (the object becomes more prominent). I know right, weird! But that’s how aperture works.
Now, stare at the room around you. Slowly, focus on your background and loose consciousness of any object in front of you. The object blurs out, right? That’s exactly how aperture works.
See how aperture can be related to our eye!
So, aperture is basically the opening of the camera lens that that focuses light rays onto the image plane. Basically, aperture controls the depth of field in focus.
When the aperture is greater, the depth of field of an image is shorter. In other words, the object in front of you is clear and the background is blurred out.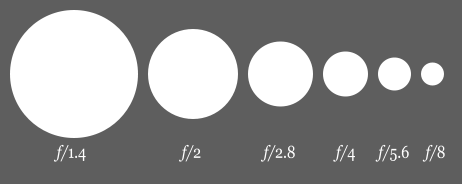
Photo from wikipedia.
Aperture is calculated in stops (the hole that allows light in, or the pupil of our eyes). The bigger the stop, the greater the aperture. But here’s the confusing part: aperture is measured with f/numbers on the camera. The smaller the f/number on your camera, the greater the aperture, the shorter the depth of field, which means a bigger stop.
The other thing about aperture is that it also controls the amount of light that reaches the image plane.Why? Because aperture acts as the entrance of our eyes. Like our eyes, the pupil is the hole that allows light through in our eyes. Therefore, aperture also allows light through. Hence, it is now connected to shutter speed.
In terms of our eye, the bigger the pupil hole, the more light enters. But here’s the catch, the greater the aperture (smaller f/number), the less light that reaches the image plane and the darker the image. This is why:
This is when you start playing around with your shutter speed, to ensure sufficient or avoid excessive light exposure.
I hope this makes it easier for you to understand:
smaller f/number = bigger stop (hole) = greater aperture = shorter depth of field = brighter image.
I know, that was confusing! But don’t worry, you’ll soon get the hang of it. Time for another cookie…
ISO
So, what is ISO? It is the measure how sensitive your camera is to light.
Basically, the image sensor, the one that controls the ISO, is the component that changes the camera’s sensitivity. It’s the most important component of the camera, and the most expensive (don’t go dropping your camera now!), as it transforms the light into an image.
Now, let’s look at the relationship between ISO and the sensitivity of your camera: The lower the ISO, the less sensitive it is to light (in other words, the higher the ISO, to more sensitive the image sensor is to light). Therefore, the camera sensor can capture images in a low-light surrounding without a flash when using a higher ISO number.
But here’s the catch: You gotta give something if you want something, right? Right! Higher sensitivity adds “noise” (grain) to your picture. You know, the fine dots that make the picture look pretty bad.
Basically, here’s the difference:
This one has the lowest ISO of 200. So, it’s really clear but extremely dark!
This one has an ISO of 800. It’s not as dark but relatively clear.
This has an ISO of 3200. See, it’s really bright but extremely noisy (grainy)!
So, my advice is to always stick to the Base ISO whenever possible. The Base ISO is the lowest ISO number of your sensor. Basically, it produces an image with the highest quality and minimal noise! It also retains the most details of an image.
In a Nutshell
Shutter speed controls the amount of light; aperture controls the depth of field, and amount of light; ISO allows you to take pictures in dark areas without a flash, but it creates noise.
Don’t worry if you still haven’t gotten the hang of these three. It’s really hard to understand them, what more master them. But the best way to get a tight grip on shutter speed, aperture and ISO is to play around with your camera. Fiddle about with that camera of yours and you’ll soon see how easy it is. It worked for me!
