Tags


01 Thursday May 2014
27 Thursday Mar 2014
09 Sunday Feb 2014
Posted in Tricks of the trade
Tags
Ohh man, I hate the haze! It’s an annual thing here in Malaysia, but this time around, it’s the worst! Smog nightmare! Fires from Indonesia are making me so ughhh!
Though it’s really hot and all I want to do is sit under the fan, haze can be quite inspiring!
Of course there are certain things to consider before photographing haze. The most important: exposing the camera lens to dirty air. It’s extremely easy for tiny dust particles to settle on the lens, so be wary. Always keep a dry, soft cloth nearby to wipe, but don’t press too hard, dust can scratch too!
So, I used to think that there was nothing to take when there’s haze. Talk about clear skies! But, if you look closely, the haze creates a pretty cool effect of mysteriousness!
Now the big question: aperture? shutter speed? ISO? So, I’ve tried a few shots and kinda know that pictures taken under haze can be easily overexposed! So, naturally a low shutter speed comes in handy, I mean verrrry low! Like 1/1000 low! As for aperture, I would choose a smaller f/number, just because I’d like the background to be blur, emphasizing the eeriness. Plus, it compensates the lack in brightness because of the low shutter speed. And ISO, I’ll stick to the base line.
Haze isn’t all that bad! Aside form hot weather, sticky sweat and blurry vision, it could actually be a really nice setting for good photography.

20 Monday Jan 2014
Posted in Tricks of the trade
Tags
aperture, ISO, photography, photography advice, photography tips, photography tutorial, shutter speed

When I first started photography, I was very puzzled about aperture, shutter speed and ISO. I call this the “Illuminati triangle of confusion”. Mainly because they’re all linked to each other (in some weird way) and I couldn’t differentiate the effects between them.
So, since the camera works by collecting rays of light and focuses it onto the lens, I thought of relating photography to ourselves. Our eyes pretty much work the same way as a camera. The light passes through our pupil, via the hole of the iris, and focuses it on the retina. So, to make things easier, I tried linking the camera to my eyes and it became so much more understandable.
Let’s get started!
The pupillary light reflex is the reflex that controls the diameter of the pupil, in response to the intensity of light that falls on the retina of the eye (glad that’s over!).
In other words, when you stare at something bright, our iris shrinks and the pupil becomes smaller, so less light penetrates through. Shutter speed works the same way. When your taking a picture in a place that’s terribly bright (like directly under the Sun), then your picture would be overexposed (way too bright). So, shutter speed controls the exposure of the image, much like the iris of our eyes. The higher the shutter speed, the more light is allowed through.
Check out the differences:
Shutter speed: 1/30
Shutter Speed: 1/125s
Shutter speed: 1/250s (Personally, I like this picture the best. It has the right amount of light, enough to see the buildings and the bright clouds)
Shutter speed: 1/800s
So, when you’re taking a picture in a bright place, don’t forget to reduce your shutter speed (unless you’re going for something gloomy and mysterious).
Don’t you think it’s time for a break…
Stare at the room around you for awhile. Slowly focus in on an object in front of you. Keep doing it. Now, do you realise how everything around the object is blur (the object becomes more prominent). I know right, weird! But that’s how aperture works.
Now, stare at the room around you. Slowly, focus on your background and loose consciousness of any object in front of you. The object blurs out, right? That’s exactly how aperture works.
See how aperture can be related to our eye!
So, aperture is basically the opening of the camera lens that that focuses light rays onto the image plane. Basically, aperture controls the depth of field in focus.
When the aperture is greater, the depth of field of an image is shorter. In other words, the object in front of you is clear and the background is blurred out.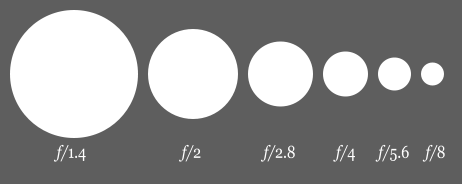
Photo from wikipedia.
Aperture is calculated in stops (the hole that allows light in, or the pupil of our eyes). The bigger the stop, the greater the aperture. But here’s the confusing part: aperture is measured with f/numbers on the camera. The smaller the f/number on your camera, the greater the aperture, the shorter the depth of field, which means a bigger stop.
The other thing about aperture is that it also controls the amount of light that reaches the image plane.Why? Because aperture acts as the entrance of our eyes. Like our eyes, the pupil is the hole that allows light through in our eyes. Therefore, aperture also allows light through. Hence, it is now connected to shutter speed.
In terms of our eye, the bigger the pupil hole, the more light enters. But here’s the catch, the greater the aperture (smaller f/number), the less light that reaches the image plane and the darker the image. This is why:
This is when you start playing around with your shutter speed, to ensure sufficient or avoid excessive light exposure.
I hope this makes it easier for you to understand:
smaller f/number = bigger stop (hole) = greater aperture = shorter depth of field = brighter image.
I know, that was confusing! But don’t worry, you’ll soon get the hang of it. Time for another cookie…
So, what is ISO? It is the measure how sensitive your camera is to light.
Basically, the image sensor, the one that controls the ISO, is the component that changes the camera’s sensitivity. It’s the most important component of the camera, and the most expensive (don’t go dropping your camera now!), as it transforms the light into an image.
Now, let’s look at the relationship between ISO and the sensitivity of your camera: The lower the ISO, the less sensitive it is to light (in other words, the higher the ISO, to more sensitive the image sensor is to light). Therefore, the camera sensor can capture images in a low-light surrounding without a flash when using a higher ISO number.
But here’s the catch: You gotta give something if you want something, right? Right! Higher sensitivity adds “noise” (grain) to your picture. You know, the fine dots that make the picture look pretty bad.
Basically, here’s the difference:
This one has the lowest ISO of 200. So, it’s really clear but extremely dark!
This one has an ISO of 800. It’s not as dark but relatively clear.
This has an ISO of 3200. See, it’s really bright but extremely noisy (grainy)!
So, my advice is to always stick to the Base ISO whenever possible. The Base ISO is the lowest ISO number of your sensor. Basically, it produces an image with the highest quality and minimal noise! It also retains the most details of an image.
Shutter speed controls the amount of light; aperture controls the depth of field, and amount of light; ISO allows you to take pictures in dark areas without a flash, but it creates noise.
Don’t worry if you still haven’t gotten the hang of these three. It’s really hard to understand them, what more master them. But the best way to get a tight grip on shutter speed, aperture and ISO is to play around with your camera. Fiddle about with that camera of yours and you’ll soon see how easy it is. It worked for me!
19 Sunday Jan 2014
Posted in Tricks of the trade
Manual or Auto? Manual or Auto? Manual or Auto?
I’m always torn between these two options when I’m taking photos. Even to the point where I miss out on those moments! I hope I’m not the only one out there who goes through this dilemma! So confusing…..
So, time to break it down!
So, basically Auto mode does everything for you– yes, everything! It sets the shutter speed, aperture, ISO, white balance and everything else! The camera gives you the “mathematically- correct” settings. But it can be fooled, so don’t get fooled cause that’s when a really good shot is compromised! *There it goes….
Manual, on the other hand, is just freedom! The photo turns out great but only if you get it. You can manipulate every photo the way you want to, which is great. But manual needs you to set EVERYTHING! Which means, you need to know everything! That’s the tricky part cause mastering the three pies- shutter speed, aperture and ISO- is kinda tricky! The other tricky part is setting everything in time. That’s my problem, I get really caught up setting everything perfectly, that I always miss out! There are lots of other stuff that you’d need to set, like white balance, manual focus and exposure.
But then again, once you’ve figured out the ISO, Aperture, shutter speed, colour balance, manual focus and other stuff, there’s no stopping to what you can do on manual!
Manual comes in handy when it comes to:
Auto is great when you’re starting off with the camera but with Manual, the creative choice is yours! I suggest star with Auto and slowly move on into Manual. Maybe start with stills when you’re taking manual, master the craft!
But don’t fret, cause we got it!! ![]()
19 Sunday Jan 2014
Posted in Tricks of the trade
Hey all!
So, today is all about those dreamy days when we’re lazy and chill and just don’t want to take any serious shots. So, what better time to take shots of cloudy clouds.
I love taking pics of clouds because it allows me to experiment with colours and shutter speeds. It’s just good for trial and error because it’s always around and I can always try again! And it’s doesn’t look intimidating (unlike longboards)!
For this page, I’m gonna post a couple of shots of clouds and just run through them. It’ll be a light and breezy post, cause I’ve learnt a few pointers about clouds after taking many, many, many shots. I’ll categorise them into a few types and you can take your pick! Choose wisely, earthlings!
First up, we’ll start with the basic clouds, the AEROPLANE BLANKET:
I know, this is really cliché taking a picture form the aeroplane, but I just had to. Clouds at eye-level are pretty amazing. I really think this the best kind of shot to get to absorb the fundamentals of clouds. Before playing around with angles and other technical stuff, we should really analyse how clouds reflect light, they move fast and are WHITE (turn up that contrast!).
Really basic stuff, reasonable shutter speed of 1/125, ISO 100 and f/22. I didn’t even play around with the colour but a bit of contrast does help bring out the “whiteness” of the clouds, that extra umppph!
Next, VERTICALLY ABOVE!
So, i literally looked up and took this shot. With minor changing of colour to give it that blue hue, I think I got a pretty dramatic effect. And also some basic shutter speed, aperture, and ISO, like I said, pretty simple stuff!
Nope, just kidding! It was an easy shot but not that easy! I needed a very, very, very fast shutter speed. Small as in 1/4000. It was to cut out the light from in between the clouds to give it that sense of gloominess. Did it work?
One of my favourites, the MOVING CLOUDS!

Hah, this is rally vain, but I really like this one. I think it’s because it gives the illusion like it was part of some time lapse or just moving really fast when I took it.
So, for a moving cloud, all it needs is a BIG aperture, and I mean big! (or in other words, small f/stop). This was taken at my camera’s maximum aperture, a f/22. Yes, big cause it really captures the movement. So, this was a really sunny day and a really short shutter speed would be thoroughly need. But because of my big aperture cutting out a lot of light, I couldn’t use a very fast shutter speed. So, instead of something like 1/4000, I opted for 1/52 shutter speed.
Time to play around a bit! The “Olympus is Falling” shot!

I’m not sure why I called it that, but it’s kinda apt. I think it’s cause of the sun rays coming out from the middle makes it look like Zeus has come down to this to marry some mortal or something 😉
In terms of technique, this was a pretty easy shot: ISO 100, f/4.5, and shutter speed 1/640 (it was a gloomy day and to make it gloomier a very fast shutter speed was not needed). The reason why it’s darker around the bottom edges is because of the position of the sun in the middle and with some changes to the light balance. So, in this shot, it’s about playing with shutter speed, angles and position of the light source.
Lastly, the RETRO CLOUD!

It’s pretty hard to get a black white shot of clouds. This may be a surprise to some, like me, but the sunlight really does blind out the clouds because of its contrast. So, f/5.6 and shutter speed 250 did the trick. I think both the elements had to be pretty moderate because of the strong contrast of the black and white. It needs a good balance and white balance!
It’s all about balance. You know, balance between fun, shutter speed (mainly) and and fluffiness! So, let me know how it goes ![]()
18 Wednesday Dec 2013
17 Tuesday Dec 2013
09 Monday Dec 2013
Tags
beach, blue, Maine, ocean, photography
The beach in Maine, warm and cold all at once!
27 Saturday Jul 2013
Posted in Uncategorized
Tags
beauty, chandi, chowk, India, marble, marble stones, photography, white
The marble stones lining the Red Fort in Chandi Chowk, India! Pretty cool, eh?

10 Wednesday Jul 2013
Posted in Uncategorized
Tags
Boating in Kashmir doesn’t get better than this!

05 Friday Jul 2013
Posted in Random
Tags
bright, festival, festival of lights, fire, photography, yellow
During the Festival of Lights!
29 Saturday Jun 2013
Posted in Travel
Tags
brown, camel, camel riding, head, India, photography, That dessert
In the Thar dessert, camel riding is pretty good!


